Hi Friends,
November is nearly half way, and the December school holidays are starting in only a few weeks. Moms will be looking for a way to keep the little ones busy. Here are a few projects that everybody can make together in the build up to Christmas.

Make this easy Christmas tree decoration with your kids. Use it as a card, or cut out the tree shape, decorated on both sides to hang on the tree. It's a great way to use up those leftover buttons you have lying around.

This Popsicle stick Christmas tree is easy to make. All you need is paint, Popsicle sticks, glue, and pom-poms or buttons or something similar to stick on the ends. Add a piece of string, and it is ready to hang on the tree.

Make this life size felt Christmas tree for your toddler. Now he will leave the real tree alone, and can decorate and re-decorate his own tree. Measure how tall you want the tree to be. Cut out a green triangle, and a brown square for the trunk. Paste trunk to the tree. Attach the tree with glue magnets or a glue gun to a wall. Trace cookie cutter shapes on different coloured pieces of felt and cut out. Decorate the shapes with craft paint and glitter. It must not be too heavy for the felt pieces to stick to the tree. Felt sticks to felt.

Use toilet rolls or paper towel rolls. Glue together in the shape of a triangle. Paint green and decorate with a paper star on top. Use buttons, painted bottle caps, pipe cleaners, foil, cotton wool, felt or any materials that you have in the house to decorate the rest. Put wrapped candy inside the rolls to eat on Christmas day.

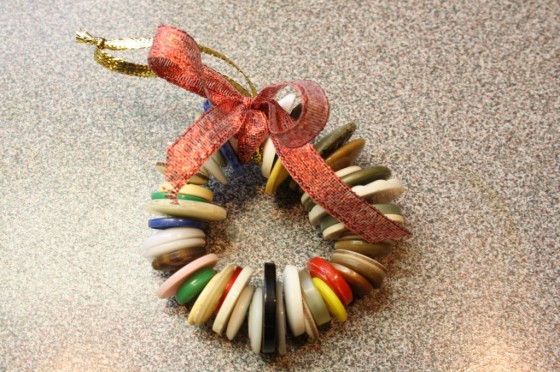
To make this cute button wreath, thread colourful buttons of different sizes onto a pipe cleaner. When the wreath is the desired size, twist the two ends of the pipe cleaner together to close the circle, wrap one end around a pencil to form a loop and wrap the end around the basis of loop. Trim excess. Add a ribbon to decorate.
Use a pipe cleaner and different sizes buttons to make this tree ornament. Take a pipe cleaner, twist one end a few times around a pencil to make the trunk. String the buttons from large to small from the other side of the pipe cleaner. Add a fancy button or charm at the top. Twist the top end of the pipe cleaner around a pencil at the basis of the top button, wrap end around the basis of loop to form a wrapped loop, and cut excess off. Add string or ribbon to hang.

If you have small pine cones in your garden, the kids can make these adorable angles. Paint the ends of the cones with silver or gold paint, or dust some glitter on top of any other wet paint you may use. Glue a wooden bead on the top of the cone, glue a flower hat on top. Use paper, felt, fabric or bead cap for the hat. Draw a circle on tissue paper or any flimsy material in the house, cut out and use a half a circle folded in half for each wing. Glue wings to cone. Glue string to the back of the head, and hang.

This tissue paper candy cane ornament is very easy to make. Cut out a candy cane shape out of a cereal box, and punch a hole at the top for ribbon or string to hang. Cut 9 x 9 cm squares of red and white tissue paper. Gather the corners of each square, crunch paper loosely at the center to form a basis, add glue to the basis of the square, and paste to the candy cane. Paste the pieces of paper tightly together. Follow a candy stripe pattern.

Use large open pine cones for this project. Paste tiny pom-poms on the tips of cone for decorations. If you do not have pom-poms, use tiny balls of cotton wool, lightly brushed with glue and sprinkled with coloured glitter. You can colour the cotton wool with food colouring if you wish.

These paint sample trees are quick and easy to make. Draw a triangle from the bottom of the paint sample to the center of the top. Cut out. Paste a paper ribbon loop at the top, and decorate with a button or paper star. If you do not have paint samples, paint different shades of green on a cereal box, draw triangles and cut out different sized trees.

I hope that you enjoyed this post. Add a comment, I would love to hear from you.
Till next time,
Happy tinkering.
ps.
x
Awesomeness!
ReplyDelete